Frequently Asked Questions
Ian receives many e-mails asking for his advice, and over the years I have found myself typing out the same answers to different correspondents.
We are therefore introducing this page for carvers and sculptors pondering over problems that Ian's long experience may help them with.
If you have a query please e-mail
Searching by subject
To search this page press Control + F, this will open a search box at the top of the page. Simply type in the subject you are looking for i.e. 'burr' and the word 'burr' will be highlighted through the page. The search facility will also indicate how many times the word is used. This facility can also be employed on other pages
Question
You mentioned that on your recent work in progress the face and torso and calves are both made out of steamed Pear. Can you tell me the significance of steaming the wood? I have heard of steaming wood to bend it for making boxes or furniture but not in a wood carving context…is pear a nice wood to carve, does it take detail well?
Answer
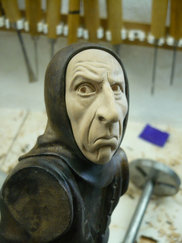
Steamed pearwood is also known as Swiss pearwood – In Switzerland the pear wood they grow is steamed as a part of the drying process to kill the boring creatures that love their pearwood. This also changes the colour of the wood slightly changing it from a pale pink to a slightly darker fleshy pink. It will take detail very well - this face is 1 3/4 inches/ 4.5 cm.
You mentioned that on your recent work in progress the face and torso and calves are both made out of steamed Pear. Can you tell me the significance of steaming the wood? I have heard of steaming wood to bend it for making boxes or furniture but not in a wood carving context…is pear a nice wood to carve, does it take detail well?
Answer
Steamed pearwood is also known as Swiss pearwood – In Switzerland the pear wood they grow is steamed as a part of the drying process to kill the boring creatures that love their pearwood. This also changes the colour of the wood slightly changing it from a pale pink to a slightly darker fleshy pink. It will take detail very well - this face is 1 3/4 inches/ 4.5 cm.
Question
I saw you where gluing 2 pcs of lime wood with newspaper in the middle. Could you tell what is it for? Is it to create a textured surface where the glue bonds better? I am curious.
Answer
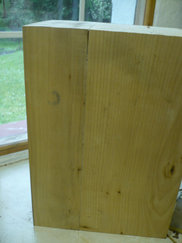
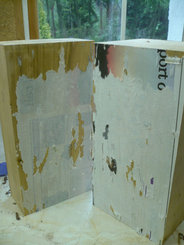
Glueing wood together with newspaper in between is standard procedure when the joint is required to be separated at a later stage. By this means I can carve the subject and at any time split it back to the perfectly smooth surfaces. The glue should be water soluble or it is difficult to remove, and it only works properly with newspaper. I have split my block, using a 1 inch/2.5 cm chisel, because due to some movement in the wood (probably not properly dry) it had started to pull apart.
I saw you where gluing 2 pcs of lime wood with newspaper in the middle. Could you tell what is it for? Is it to create a textured surface where the glue bonds better? I am curious.
Answer
Glueing wood together with newspaper in between is standard procedure when the joint is required to be separated at a later stage. By this means I can carve the subject and at any time split it back to the perfectly smooth surfaces. The glue should be water soluble or it is difficult to remove, and it only works properly with newspaper. I have split my block, using a 1 inch/2.5 cm chisel, because due to some movement in the wood (probably not properly dry) it had started to pull apart.
|
|
Question
Have you given any thought to a portable work bench.
Answer
I use a Superjaws which folds up easily to go into the car boot. It is very powerful and stable. It is made in Australia by Triton and the cost I believe is about £150 – it really is a great piece of Kit. Betty has found a demonstration on U-tube @ http://www.youtube.com/watch?v=3GrxZTaT6UA
Question
The new carving 'Pierrot' is very interesting, what are you using to bleach the lime with?
Answer
Pierrot will be bleached using 60% peroxide mixed to a paste with a blue powder – all available from your friendly hairdresser. It will be on the site in March when I do it.
The new carving 'Pierrot' is very interesting, what are you using to bleach the lime with?
Answer
Pierrot will be bleached using 60% peroxide mixed to a paste with a blue powder – all available from your friendly hairdresser. It will be on the site in March when I do it.
Question
I plan to mount a sculpture on a piece of marble. The marble is quite attractive and I don't want to crack it with improper drilling. I haven't drilled marble before and, aside from the obvious - marble bit and working slowly with the drill press. I wanted to ask the expert...Ian, do you have any instruction on drilling a 15mm thick piece of smooth marble?
Answer
Use a sharp masonry drill in a drill press if you have one. Some marble is much harder than others so I put water in the hole to keep the drill cool. Try to avoid drilling on a seam of crystals as it may split. A flake of marble usually breaks off where the drill exits. Having the block firmly clamped to a flat surface may prevent this, but not always
Question
In your book, "Fundamentals of Figure Carving," page 14, you picture a vernier which has been adapted for measuring two dimensional drawings onto curved surfaces. How did you adapt the vernier?
Answer
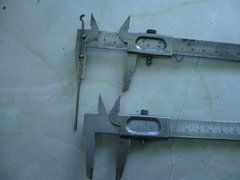
I used a cheap vernier and drilled two holes in it, to fit two small bolts - these were drilled to take a steel rod. The threaded ends (on the reverse side) have small wing nuts to tighten them. The vernier is then opened to fit a face for example and the rod extended to locate the position of the ears. It does work very well.
In your book, "Fundamentals of Figure Carving," page 14, you picture a vernier which has been adapted for measuring two dimensional drawings onto curved surfaces. How did you adapt the vernier?
Answer
I used a cheap vernier and drilled two holes in it, to fit two small bolts - these were drilled to take a steel rod. The threaded ends (on the reverse side) have small wing nuts to tighten them. The vernier is then opened to fit a face for example and the rod extended to locate the position of the ears. It does work very well.
Question
Please could you advise me how to go about carving the mouth which is smiling, and with the top row of teeth showing, as I fear if I don't get it right it will ruin the whole carving.
Answer
What you are proposing I do not believe I have done. The nearest is the girl’s head in my book ‘Carving Classic Female Faces’ which shows the basic steps in carving the teeth, but this is an open mouthed grin with just a few teeth showing. Observe the curve of the teeth is very small compared to the face and there is almost always a dark cavity at either side. This size and shape of the teeth must be carefully measured to avoid a ‘piano key’ look. The line where the lips meet the teeth must be very cleanly cut and the teeth finely cut in with a knife; then exceptionally well sanded to create an immaculate finish and no nasty little corners and rough edges.
Question
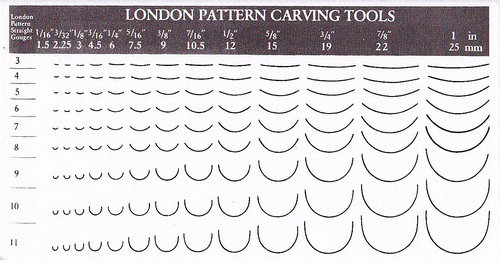
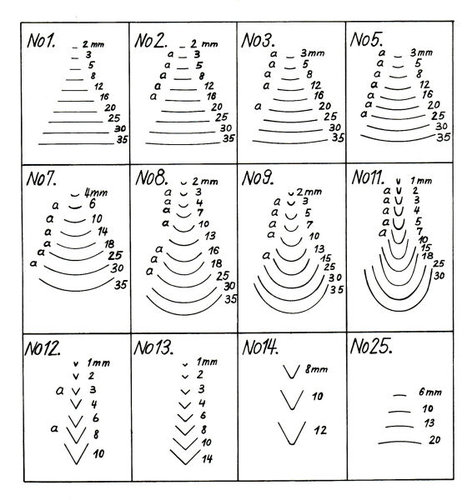
My question is, are American tools numbered the same as the continental?
Answer
I only know of 2 sizing systems the 'London Pattern’ used by most carving gouge manufactures and the numbering system used by the Swiss company Pfeil.
My question is, are American tools numbered the same as the continental?
Answer
I only know of 2 sizing systems the 'London Pattern’ used by most carving gouge manufactures and the numbering system used by the Swiss company Pfeil.
|
|
Question
Why don’t you state the size of timber required for your DVD projects
Answer
Each DVD contains plans for the carving which can be adjusted to the size of available timber.
The sizes of my original carvings are really irrelevant, since, carvers have different access to timber.
Most of my DVDs are sold in America where timber is almost exclusively kiln dried, so most of the blocks used on my courses there were laminated. In Minnesota and California however they had no problem getting 5 & 6 inch basswood (limewood). In Australia timber varies from state to state.
Personally I’ve never had a problem accessing 5 or 6 inch lime in England, but I have my own cut to 9 inch allowing considerable leeway in the choice of pose – if the wood is too small stick bits on.
Question
I asked a while back if any plans/ drawings were available. Your reply mentioned that you don't keep your drawings. I have been wondering if it is possible. What the cost would be if Ian would be willing to produce a working set of carving line drawings for a similar 'Aphrodite' figure? So I may make an attempt.
Answer
To make a set can take anything up to a week – those for ‘Venus’ took even longer. So realistically I cannot just knock up a set.
Question
I am going to (attempt) carve your piece entitled 'The Bather' my intent is to carve it to about the full size that your original is (about 24+") I am wondering what the rings about her upper arms are made of, I'm hoping that copper pipe of about 11/4" might work. My choices of wood will be basswood, or butternut, I would appreciate your opinion on what wood she would look best carved from.
Answer
I used copper pipe, but I believe it was 1 inch which I hammered on a piece of steel until it was a fit perfectly (you can just see the hammer marks on the photographs). Personally I would use basswood (the same as my limewood) as I do not like a lot of grain, but it is a personal choice. On butternut I think I would use silver finger rings which are pretty cheap and would show up nicely.
Question
I love the Haida mask in the sale section. Can Ian recommend a book, or a pattern so I can give this type of mask a try?
Answer
I have a few books on Haida Indians; the one I used for reference and would recommend is ‘From the Land of the Totem Poles’ by Aldona Jonaitis.
I love the Haida mask in the sale section. Can Ian recommend a book, or a pattern so I can give this type of mask a try?
Answer
I have a few books on Haida Indians; the one I used for reference and would recommend is ‘From the Land of the Totem Poles’ by Aldona Jonaitis.
Question
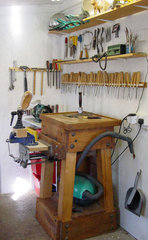
Could you tell us about the white tool holders, holding all your chisels and if available a source?
Answer
They are clips for water pipes available in three or four different sizes at any plumbing store – in the UK anyway – at very little cost.
Could you tell us about the white tool holders, holding all your chisels and if available a source?
Answer
They are clips for water pipes available in three or four different sizes at any plumbing store – in the UK anyway – at very little cost.

Question
What is the brand name of the blue sanding cloth you use, from what company could I purchase some from?
Answer
I use garnet paper for the fine details and corners because it flakes off the least when folded. Mainly I use Hermes RB406 J-Flex Roll which I get from CSM Abrasives who sell so much stuff for sanding it gives me an anxiety attack because I do not have it!
Question
I have 4 walnut logs ranging from 12-14 inches in diameter and anywhere from 14" to 4 feet long. How would you recommend I cut these into squared timber? I have a friend with bandsaw and I have a small chainsaw.
Secondly, if I were to use take some poplar that has only been felled from a tree for a little over 2 months, is it best to wait longer before I cut into this piece or go ahead and square it off and cover it with a bag since it is so fresh? I plan to work the walnut first but don't know how long it would be before the poplar begins to split. What has been your experience with these two types of wood?
Answer
You have a problem. You do not say how long these logs have been cut, where they have been stored or in what climate. Outside in Ireland they would still be growing – in Texas they would be kiln dried!
Logs split to the heart as they dry, on the outside first, which shrinks and so splits. You are supposed to cut them down through the heart to stop this, but then you have much smaller wood.
A lot depends on what you carve, a portrait head, being blockish, would split if you made it from a log. A figure, where most of the wood is removed might not, if you keep it sealed in a polythene bag all the time you are not working on it. I’ve done it, but it is very uncertain and very long winded gradually drying it for months.
To use the whole log without cutting it square, make a plywood box and bandsaw through it – see my video – ‘Carving a Female Figure 2’
I’ve only tried poplar once and I’d say ‘forget it’, unless its on a very large scale – its like carving a box of Kleenex! I’ve no idea how or when it will crack.The whole business of using green wood is a nightmare – personally I spend too long on a piece to risk it.
Question
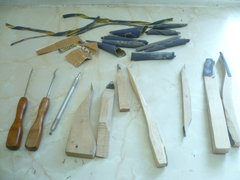
When you next come up for air could you recommend which of your books would best explain to me the techniques of achieving the first class surface present on all of your work that I have ever seen ?
Answer
The finishing is really sanding I suppose, there is a chapter on ‘Fundamentals of Figure Carving’dealing with it, but we move on and now I use a lot of diamond burrs and files and high quality sanding cloth (the blue stuff) stuck to shaped bits of wood with superglue. Everything is finished with matt Ronseal, brushed on and wiped off with tissues about three times. Pictured is the sanding equipment I used for the little man for 'Destiny'
Question
I live in the UK and have one of your DVD's and have had trouble finding a suitably sized piece of Lime.It's for the Lady carving, I think two foot long by five inches square. Could you please point me in the right direction!
Answer
I have always bought his timber from Jack Clark at Rolston Timber, his telephone number is 01886 833612 I highly recommend him.
Question
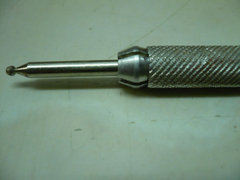
Ian's blog shows a picture of a Sanding Kit. Displayed, third from bottom left is a double-ended burr holder in which I am interested. Would you pleaser give me the name of the supplier, or their website address for this product?
Answer
The little tool I used to hold diamond burrs for sanding was kindly given to me by a guy on a course in the U.S.A. Where he acquired it or who made it I have no idea. It has no makers mark. It consists of an aluminium tube, threaded inside each end with collets that screw into the two ends. Thanks to blog readers we now know it is called a pin vice and obtainable on the net at http://www.mcmaster.com/#pin-vises/=bspozm http://www.texaswoodcarvers.com/Tool_Catalog/Burs_Ruby.htm andhttp:www.trainsnrailways.co.uk/catalog/tools/gaugemaster-gm610-double-ended-pin-vice-2071.html as well as Amazon and e-bay. Thank you to all who wrote in with the info.
Question
Are you ever likely to publish a book of carving patterns, particularly human figure patterns? I have already tried a number of ones from your various books and videos with varying degrees of success. All of the patterns in your books are of standing figures, with one exception. I would love to have a go at a sitting and a reclining figure. I have tried devising patterns from photos on the Live Model Pose website (PoseSpace.com), but none of the photo shoots provide views from above to create a top profile which I assume is required for such poses. In the end I was forced to take up clay sculpting to try to work out the poses! Many of the top American/Canadian bird carvers have created pattern books (e.g. Pat Godin) or sell individual patterns (e.g. Gordon Stiller). I am sure that there would be a market for both - either as hard copy or for downloading off the internet. The pattern books just carry the patterns with only a small amount of text.
Answer
I guess the answer is no. Most of the patterns I used in the past are long thrown away. I basically make up my figures from the anatomical structure based on a particular pose as illustrated in the chapter 'Creating your own Figure' in my book 'Fundamentals of Figure Carving'; page 129 clearly illustrates how to produce a top view of a pose. I also recommend you get a book – ‘Illustrator's Reference Manual Nudes’ published by Bloomsbury, which has several reclining nudes from all angles, or the ‘virtual Pose’ series. Of course the real answer is a live model
Question
I would like to know how you so seamlessly attach limbs to torsos.
Answer
Arms attached to nude figures are simply a flat glued joint with a ring covering the joint. – see page 109 in ‘Fundamentals of Figure Carving’
In the case of clothed figures, to which I assume you refer, it is mostly a case of using normal seams in clothing to disguise the join. On harlequins the inlays can actually cover the joint completely. In the case of, say, a jester, the head is carefully fitted into the hood ( the head may only be the front half). The legs are divided on the line of the buttock and crutch where the seam would be. They are attached under the line of the belt to the upper torso, and so on.
The joints are hollow – i.e. there is a dip in the centre of each half which is filled with epoxy resin, while the outer rim has cyno-acrylic for an instant bond while the epoxy cures. A bit like I imagine a hip replacement to be!!
Question
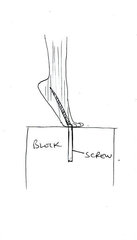
I have recently completed both the carvings as instructed in the “Carving the Female Figure” DVDs. I’m very happy with the quality of instruction and information contained on the DVDs. I do have one question though regarding mounting the completed carving to a base. I’m assuming that the carving is simply bandsawn from the base of the block but I’m not sure what the best method would be to fasten it to say a stone or marble base for presentation. Do you use dowels, screws, adhesive, or something else to secure the carving to the base? Since the area of the feet that makes contact with the base is somewhat small I can see how it may end up being too delicate if not done properly. I am mostly concerned about the second one due to the additional weight of the stone. I just don’t want the feet to split or break after mounting. Any information or ideas you could share would be appreciated.
Answer
I mount a figure in the following way
1. Locate the area that will sit on the base – i.e. the balls of the feet.
2. Drill an ⅛ inch hole from the ball of the foot through the thickest part of the foot into the ankle where there is longer grain.
3. I use a long screw – say 3 inch No.10 as a dowel. The screw will have to be softened (annealed) in order to bend without cracking.
4. Insert the screw into the foot – adjusting the drill hole as necessary – and mark the level of penetration on the screw.
5. Remove the screw and bend it so that the exposed section will be at right angles to the foot.
6. Cut off the head of the screw.
7. Re-insert the screw, coated in epoxy resin, ensuring the exposed section is vertical to the figure. This can be adjusted slightly by bending.
8. Having drilled the base at the appropriate point – insert the screw, with epoxy coating, into the base – Voila!
Question
I have purchased a bandsaw and up to now I could not find anyone giving me advice on the ideal width of the blade to use. The bandsaw came with a 12mm blade which does not allow for a lot of curving. A 3.5mm blade allows for a 5mm radius but I wonder if such a blade can be used to saw a 200mm block?
Answer
For my bandsawing I use exclusively a ¼ inch (6mm); 6 teeth per inch (25mm); skip tooth blade. I find this does everything I want. I find it very difficult to control and I don’t think it would cut 8 inch (200mm) wood accurately. Most of all the blade must be new and sharp.
Question
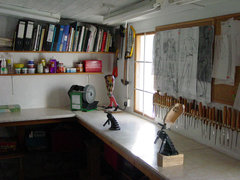
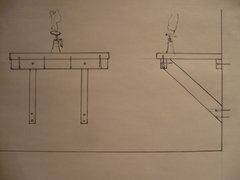
I don't know the first thing about workbenches other than I need sturdy one (with a hardwood top) if I am going to continue working in wood. I've searched for at least a week now for the "perfect workbench" and I still can't decide where to start. I do have your book Fundamentals of Figure Carving and realized on page 15 that you also don't use a fancy bench.
Do you have any suggestions for an intermediate level woodcarver who doesn't want to put a lot of money into building a good bench? I am 6'-1" tall and will probably be standing. I've seen so many traditional European workbenches with dog holes (whatever that means) and adjustable heights which I don't think are necessities for this purpose. I don't need planers or jointers or anything of the sort. Just my tools and my wood! What would you say to this bench I found today?
Answer
The bench in the illustration you sent looks like a major project to make and would probably be on the move and wobbling all the time.
I made a very heavy one from oak which I still have (instructions for construction on page 21 of ‘Techniques of Creative Woodcarving), which I put 4 x 56 pound weights in and still it moved.
I have purchased a bandsaw and up to now I could not find anyone giving me advice on the ideal width of the blade to use. The bandsaw came with a 12mm blade which does not allow for a lot of curving. A 3.5mm blade allows for a 5mm radius but I wonder if such a blade can be used to saw a 200mm block?
Answer
For my bandsawing I use exclusively a ¼ inch (6mm); 6 teeth per inch (25mm); skip tooth blade. I find this does everything I want. I find it very difficult to control and I don’t think it would cut 8 inch (200mm) wood accurately. Most of all the blade must be new and sharp.
Question
I don't know the first thing about workbenches other than I need sturdy one (with a hardwood top) if I am going to continue working in wood. I've searched for at least a week now for the "perfect workbench" and I still can't decide where to start. I do have your book Fundamentals of Figure Carving and realized on page 15 that you also don't use a fancy bench.
Do you have any suggestions for an intermediate level woodcarver who doesn't want to put a lot of money into building a good bench? I am 6'-1" tall and will probably be standing. I've seen so many traditional European workbenches with dog holes (whatever that means) and adjustable heights which I don't think are necessities for this purpose. I don't need planers or jointers or anything of the sort. Just my tools and my wood! What would you say to this bench I found today?
Answer
The bench in the illustration you sent looks like a major project to make and would probably be on the move and wobbling all the time.
I made a very heavy one from oak which I still have (instructions for construction on page 21 of ‘Techniques of Creative Woodcarving), which I put 4 x 56 pound weights in and still it moved.
What I use now couldn’t be simpler. A piece of standard 2 inch thick laminate kitchen worktop resting on 3 x 2 inch battening bolted to the wall. Two 4 x 2 inch timbers bolted to the wall to slope up to support the front edge. Another piece of 3 x 2 inch is screwed under the front edge and jointed into the 4 x 2 inch.
You can put more support in if you want. It is as solid as a rock. The clamp I use is a Veritas with a ratchet type machine handle through the worktop to hold it in place and allow it to turn.
You can put more support in if you want. It is as solid as a rock. The clamp I use is a Veritas with a ratchet type machine handle through the worktop to hold it in place and allow it to turn.
|
|
|
Question
My experience is that lines and marks made by a pencil are easily rubbed out in the next couple of hours but difficult to remove if I leave them for a couple of days. (It seems like the graphite penetrates into the lime wood). Is this because of the type of (soft) pencil I use? Suggestions?
Answer
I would avoid using a soft pencil. As you say it tends to get smears all over the carving and your hands; and the wood becomes a dirty grey which has to be removed. I use either a hard pencil (2H) or a ball point pen. On dark wood I use a white pencil.
Question
When working with diamond inlays in a heavy folded area, what is the thickness of the leaded template and how do you get the diamond dimensions to match the heavy folded cut-out area?
Answer
Inlaying a diamond into a deeply folded corner is very difficult. For the templates, I use lead sheet which is about 1/8 inch thick. This can be beaten out to the thickness required. For a deep corner I would use it the thickness of thick paper. I cut the lead to the shape of the diamond and press this into the area, then apply the tiniest amount of Superglue and stick it in place (too much and it will not come off in one piece).
Now cut round the edge of the diamond with a knife into the wood, then remove the template, reforming it on the folds. The recess is now cut into the wood using burrs and small gouges. The recess must be quite deep.
Now cut the inlay using the template. This may not be very accurate so err on the side of being oversized. It must also be thicker than necessary. Now chamfer the bottom edge of the inlay until it will enter the socket. Push the inlay in with carbon paper between to mark the inlay. Cut away the marks. Repeat over and over until it fits, then carve the folds.
My advice is to use a dark wood and glue the inlay in place with epoxy resin coloured with powder pigment to match the wood. This should eliminate any misfortunes. This process could take half a day.
Question
I need to glue a large block of wood. Could you please tell me about prepping wood, gluing, dry time, aligning grain, and what to do in the case of cracking to make it all appear seamless? I would like to use a light coloured wood with as subtle grain as possible. Is limewood called basswood over here?
Answer
With regard to gluing up blocks – I don’t do it – I am able to buy large pieces of air dried wood. Problem is in the U.S. the wood is mostly kiln dried and not very big. Dark wood hides joints better than light wood. The surfaces must be absolutely perfect – very difficult without good equipment.
The blocks may eventually shrink slightly differently, leaving tiny steps all round your carving. The join will almost always show, no matter what you do.
Anyway, if your carving is really big you will not be able to bandsaw it, and that is crucial to my methods.
There are some suppliers of quite large basswood (limewood - it is the same species) in California. Contact Wendy or Bill at the Ventura Woodcraft Store (where I gave a seminar in 2009)[email protected]. They seemed to be very amenable to getting basswood for their customers
Question
How can I cut away the bulky material on a two foot high carving without a bandsaw?
Answers
1. The very best answer is to find someone with a bandsaw. For a few years I used to pay a joiner to do it for me.
2. Use a handsaw to make numerous cuts up to the outline and then knock the pieces out with a big chisel.
3. Use power gouges or a rotary disc such as an Arbotech.
4. Use a chainsaw.
The problem, apart from the work involved, is the lose of accuracy and the impossibility of re-attaching the pieces to make the cut on the second side.
